
Kite Safety
Choosing A Safe Spot to Fly
The good thing about kite flying in the UK is that you are never too far away from a beach or large open space, but there are still a few things to consider when choosing a good spot to fly. An easy way to check if your spot is safe to fly is using the S.H.O.E. method.
- S. Surface: this means the actual ground under your feet. Grass or sand are the only acceptable surfaces on which to fly kites. Anything else such as tarmac, pebbles, or ploughed fields is likely to cause injury if you stumble. If you’re in a grassy field, check for lumps and bumps in the earth, puddles (slippery!), shredded cans from grass mowers, stones, or anything that can cause injury. If you’re on the beach, look out for pebbles, stones, holes (kids and dogs love to dig!), debris or anything else that may be painful if you fall on it.
- H. Hazards: hazards are objects that you simply do not want to crash your kite onto, or be pulled into. Bins, fences, buildings, electrical wires, ice cream vans, benches, goal posts, volleyball nets, parked cars - ANYTHING that’s downwind of you basically. To ensure your area is free from hazards, find a spot that gives you TWO line lengths (around 50m) of clear downwind space, and about one line length (25m) either side.
- O. Others: dog walkers, kids, football teams, cricket matches, walkers, other kite fliers, cyclists, picnickers - anyone else using the same space as you needs to be considered. As we’re the ones flying the kite, it’s our duty to keep clear of others. When you set up to fly, look out for paths and other areas that people might start to use as the day goes on and keep a safe distance away.
Remember – beaches and parks get busy in summer, so sometimes the evening, when it cools down a bit, can be a good time to go. - E. Environment: This refers to the wind conditions and the weather for the day. You should look at the wind forecast by checking BBC Weather or other online resources for your area to get an idea of how strong the wind will be and what direction it will blow from - but remember it can always change!
The best days to fly kites are clear and bright or with flat skies and with gentle to moderate steady breezes. Blustery, stormy days with stacked clouds and bursts of rain should be avoided.
Never kite near
- Power lines
- Train tracks
- On cliff edges
- Near steep drop offs
- Roads
- Power stations
Flying Your Kite
It is a very exciting to fly a kite for the first time, and people want to rush straight in. However a lot of time and frustration can be saved with a methodical, safe approach. Following these steps will get you kiting sooner and with more gratification.
Your new kite will come with instructions from the manufacturer to help you set it up. Please refer for them to them before you fly.
Kite Safety
- Never grab the lines of the kite whilst it is in flight or unsecured on the ground.
- Never wrap a line around your hand or any part of your body.
- If your kite comes with safety leashes, be sure to attach them before launch.
- Never let anyone in your group stand between the flier and the kite.
- If a person or animal wanders into your flying zone, either keep the kite steady in the sky or land it and secure it.
- If in doubt, release the handles or bar with both hands to deploy the kite safety mechanism.
- Always remember S.H.O.E.!
Set Up
- Make sure your area is safe to fly and free from obstruction.
- Lay your kite out 25m downwind from where you will be standing.
- Secure the trailing edge with sand, or have an assistant hold the kite down.
- Unwind your lines directly upwind, place the handles or bar on the ground. (If your lines are unattached, you will have to attach them, refer to the manufacturer’s instructions).
- Walk back up to the kite, check the bridles are not tangled.
- Resting the lines on your hands – do not grip – and with the kite secured, walk back to the handles to check for any twists. Untwist your lines at the handles end, do not spin the kite.
First Launch
- Attach safety leashes to your wrists.
- Pick up the handles or bar, red in the left hand, blue in the right hand.
- Practise letting go of the handles or bar to simulate emergency release:Unassisted launch: walk slowly backwards till the kite fills with air.
- Assisted launch: give a one thumb up to your buddy.
- Take a quick step back, give a steady pull on the lines and let the kite fly straight up to 12 o’clock.
- Once the kite is flying, you should familiarise yourself with the safety system by letting go of the handles or bar.
How To Control Your Kite
Kite control can seem perplexing at first, but it is as simple as riding a bike, in that no matter how technical an expert makes it look, all they are really doing is pulling left and right with their hands.
All kites work in the same way regardless of type or size. They have a leading edge, trailing edge, and wing tips.
The leading edge is the front part of the kite that moves from the sky first, kind of like the front of your car, wherever the leading edge points, that’s where the kite will go. If it’s pointing up, the kite goes up. If the leading edge is point down, the kite goes down.
The kite rotates around its wingtips as you steer it around the sky, it is just like watching a seagull pivoting around its inside wing as it turns a circle.
The trailing edge is simply there to give the kite a bit of ‘drag’ and stability in the sky so that it is not too hard to control.
Steering Your Kite
This is not something that you can read about and expect to master, but there are some key tips:
- Steer the kite as if you were riding a bike, not driving a car. This means push and pull – the left hand pulls the line to steer the kite left, the right hand must be pushed forward and vice versa.
- Keep your arms out in front of you, shoulders relaxed. When you steer with the push pull technique, keep your hands quite close together, your wrists should almost brush each other as you steer.
- Never cross your hands, even if the lines get twisted or the kite is upside down on the ground.
- Use smooth steady push pull movements. Start in small figure of eights at first, and then slowly build up.
Key tip: Mark out an object in the far distance that is straight downwind from where you are, such as a distant church spire or mast. Use this as your centre point when you fly the kite in a figure of eight.
The Wind Window
The Wind Window might sound complicated, but it is really just the area in the sky in which your kite can fly.
The edge of the window
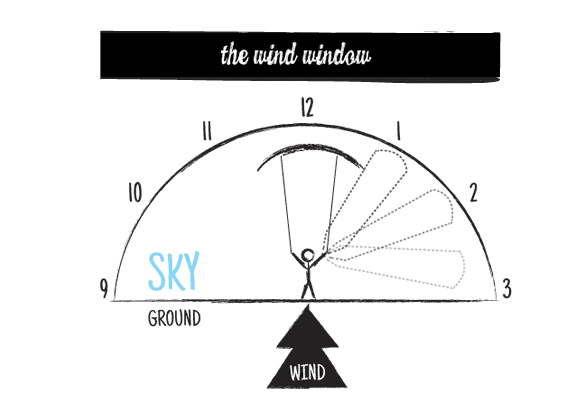
Flying the kite around the edge of the window produces the least power. The simplest way to visualise this is to stand with your back to the wind and stretch both of your arms up so that you are pointing directly up to the sky. The positions where your hands are now is 12 o’clock – and that’s as high as your kite can fly. Now, imagining your hands are a kite, lower them slowly down until they reach the 3 and 9 o’clock positions. Your kite can trace this arc, and this is the outer edge of the wind window. Once a kite is flown to 3 or 9 o’clock, it will be resting on the ground.
The power zone
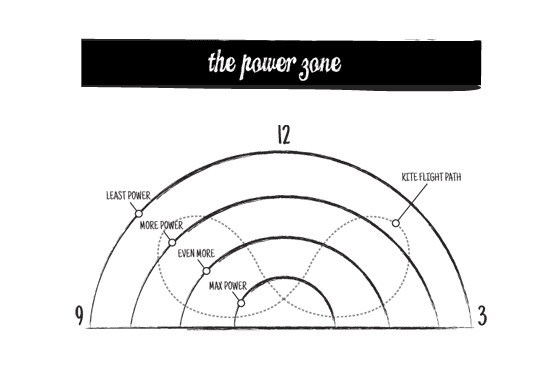
Flying your kite into the power zone will make it accelerate and produce more power. Now, remember when you traced that big arc with your hands? Imagine a smaller arc inside that one, and a smaller one inside that one, and so on, just like a rainbow. As the kite moves further into these smaller arcs, it produces more power. The way to do this is to fly your kite in a figure of 8 pattern.
Understanding Wind Flow
Except in volatile storms or pockets of unstable air, when the wind blows without obstruction it will flow in a smooth, or ‘laminar’, pattern. Much like a wide, slow river; the movement of water is easy to predict, but when you add bends, narrow gaps and weirs, things get different. We can’t see the wind, but we can predict how it will react to local effects.
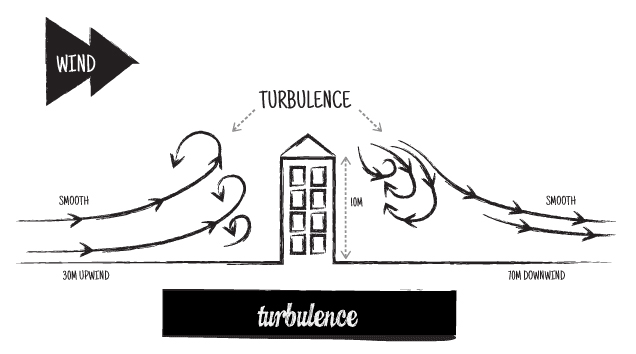
Zones of turbulence are created when wind blows over a feature such as trees, buildings, high walls and other structures.
In close proximity, both downwind* and upwind** of an obstacle, wind will be very turbulent and you should NOT fly your kite in this zone. As you move away from the obstacle, the wind will get smoother. To find steady kiteable winds, follow these rules:
- Downwind turbulence zone: estimate the height of the obstacle, multiply it by 7, and that’s how far downwind you need to be for clear wind.
- Example: a house is 10m high with the wind blowing over it. Therefore, you must be at least 70m downwind of the house to find smooth wind
- Upwind turbulence zone: estimate the height of the obstacle, multiply it by 3, and that’s how far upwind you need to be to escape turbulence.
- Example: a cliff is 50m high with the wind blowing against it and you are stood on the beach. You need to be 150m upwind of the cliff to escape turbulence.
*Downwind: When you have your kite in the sky, you will have your back to the wind. Everything in front of you is DOWNWIND.
**Upwind: And with your back to the wind and the kite in the sky, everything behind you is UPWIND.